

The question of how to tint car windows yourself comes up very often - especially in, and we are not always talking about darkening film, but also about athermal film, which often passes GOST standards. The good news is that the theoretical part of tinting car windows yourself is very simple and consists of several steps. But in practice, not everyone succeeds in tinting their windows with film the first time, and if the side windows, due to their size, are easier to tint, then the front windshield and rear windows are much more difficult to tint, because they are large in area and curved.
By the way, you can buy ready-made tinted windows from your car dealer or somewhere from unofficial representatives. But keep in mind that this is quite expensive, and includes the work of replacing tinted windows. Moreover, if you change your mind and want to return completely transparent windows to the car, you will have to go through the entire replacement procedure again. It is much easier to tint existing windows. The ability to tint car windows is available in specialized stores in two forms - in the form of a transparent tinted film that is glued to the glass inside the window, or in the form of a spray in an aerosol can.
Film (A) and spray (B) for window tinting
There are pros and cons to both tinting methods. Spray tinting is more expensive, but it is faster to apply, and overall the spray gives best result on windows that are curved. The downside to the spray, however, is that if you haven't tinted your car this way before, the end result will be an uneven tinting of the windows with lighter and darker areas because you won't be able to apply the spray perfectly evenly across the glass. Spray tint shades are available in various colors: gray, green, blue, gold and even with a mirror effect.
Film tinting is much easier for beginners to apply during their first experience of tinting a car, but in general there are more steps for pasting, and you will also have to spend more time on it. In addition, in the case of film tinting more possibilities subsequent defects, defects or consequences of improperly performed work (the film peeling off, its cloudiness, fading, the appearance of bubbles, simply a change in ductility, etc.). But it’s much easier to remove film tint later than if it was applied with a spray.
Legal restrictions
Always remember that in our country there are large legal restrictions on tinting all windows - both front and rear, in cars.
First and foremost, mirror tinting is prohibited on any glass (front or rear).
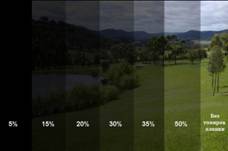
Secondly, the windshield and front side windows must provide general light transmittance of 70% of light (traffic regulations, clause 7.3 of the “Basic provisions for vehicle approval” + Technical Regulations of the Customs Union, clause 4.3). The word “general” is especially emphasized - the fact is that if you buy a tint film with a darkening of 30% or even 20%, then, most likely, your glass will still not pass the test with a special device used by traffic police inspectors - with From the factory, almost all glass already has a light transmittance significantly less than 100% - often from 85 to 95%. The same applies to athermal film - we have a special article about why athermal film does not pass the light transmittance test.
Third, on the windshield passenger cars On top it is allowed to glue a strip of tinting with any light transmittance. The main limitation here is that the tint strip should be less than 14 cm wide.
Fourthly, rear windows can also be tinted with any light transmittance, but there is also a condition here - the presence of external side rear-view mirrors on both sides of the car.
How to tint car windows with film - step-by-step instructions
First of all, we note that in order to get a good result of film tinting, you must work in a warm, dry place away from direct sunlight. There should be no dust in the room and no possibility of any settling of even the smallest particles on the film. Therefore, even in a garage with a concrete floor, you should wet it (the floor) with water to prevent dust from rising. Clothes and hands should also be clean.
What you will need:
- Directly the film itself, purchased in advance from the store in the required quantity.
- Rubber spatula.
- Spray bottle or plastic bottle volume of at least a liter with a sprayer.
- Stationery knife or blade.
- Air dryer (preferably a construction one).
- Something foaming from household chemicals (shampoo, liquid soap).
- Roll of tape.
- Rags (you need to choose rags that in no case leave behind lint and threads).
- Transparent high-quality nail polish that does not yellow over time.
So, let’s begin the steps on how to tint your car windows yourself!
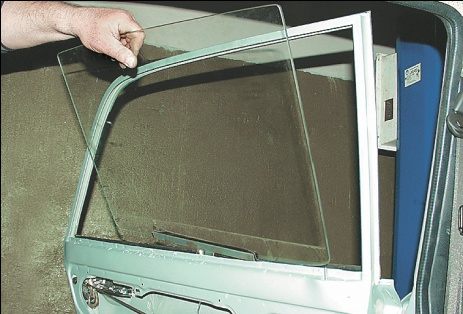
1. Ideally, you will have to remove the car windows. But this is not always necessary to do - remove the seals (you may have to remove the door trim for this) from the windows.

Tinted film is applied to the inside of the window.
2. Clean the glass itself from any dirt and dust.

Wet the window with a solution of detergent and water in a spray bottle. To wipe off excess water and dry the glass completely, use a dry cloth (ideally suede).
3. Measure 7 times, cut once! Measure each window, then lay out the tint film and cut the correct pieces to fit the shape of each window. Cut the film with a margin - at least 2-3 centimeters wider than the window, and 3-4 cm below the window. Also keep in mind that only one side of the film will adhere to the glass, so make sure you cut the correct shapes for each side of the windows.

You may also find it easier to cut the film by simply applying it to the glass - in this case, also, do not mix up the sides of the film.
4. Using the same solution you used to wash the glass and a spray bottle, carefully and generously moisten the adhesive side of the film and the window itself.
5. Now the most crucial moment - we glue the film to the glass. From a piece of film cut to size, remove the protective backing, but not completely, but from the upper half of the piece, covering the adhesive side of the tint film. Open the window slightly (lowering the glass 3-4 cm). Glue the film onto the glass with the adhesive side to the glass, starting from the top (the bottom of the film is still with a protective coating) - grab the edges of the film, estimate its dimensions on the glass and stick it. Next, going down, remove the protective coating and glue the bottom part of the film - you should have a little more reserve at the bottom than at the top. Make sure that the film covers the entire window area.

Then, using a spatula, begin to expel the previously applied solution from the space between the glass and the film so that it is completely gone and no swelling is visible. Be extremely careful - if the spatula is too rough and hard, you can use a wad of dry rag instead.
Then dry the glass completely with a hairdryer.
5. Trim the excess film around the edges by gently pulling it along the edges. Cut the film so that it remains just a little smaller to the edge of the glass - about 0.5 mm at the edges. Use a ruler on the straight edges of the glass to ensure an even cut.

6. Cover the edges with varnish. Carefully but thinly apply nail polish along the edges of the film to seal the edge of the film. Allow the varnish to dry completely before opening (closing) the window. Replace the seals and do not open the windows for at least a day to allow the tint to fully adhere.

How to tint car windows with spray?
As we noted above, in theory, it is much easier to tint car windows yourself with a spray, but only in theory.
Start by cleaning and washing all the glass, in this case there should also be no dirt, grease or dust. In addition, tinting must be done in a draft-free room.
Protect areas of the car body, upholstery and plastics close to the windows from spray splashes by covering them with large newspaper and tape. Fall asleep in dashboard and tools too.
Lower the window down a little so that you can cover the top edge of the glass. Then, once the top edge is dry, lift the window back up to cover the bottom edge of the glass.
Thoroughly shake off the can of tint spray to ensure an even color.
Bring the can to the glass at a distance of approximately 15 cm (check the instructions for the spray) and, first starting to move it, press the button so that the aerosol begins to be applied to the glass. Be extremely careful and precise - the paint should apply evenly - without thickening and, conversely, gaps.

Do not use the window lifters until the spray has completely dried, and during this time it is advisable not to remove the newspaper and tape from the glass.
Tinting car windows is not the most difficult task and can be done with your own hands. Of course, any auto repair shop will gladly undertake such work, but if you do it yourself, you can kill two birds with one stone - save a lot and do everything the way you want. Car window tinting is extremely popular. Even legal restrictions do not interfere with it, which, in fact, prohibit obscuring the view of the front of the car. Most factory car windows already have a slight tint, so if they are tinted with film, they may go beyond the permissible 70% light transmittance for the front semicircle of the car. But the rear part is not limited by traffic rules and GOST, and here you can win back by completely protecting passengers and the interior from scorching sun rays.
Stages of work
There are many photos of cars, as well as videos that show what cars look like before and after proper work. After looking at them, you will definitely want to do this yourself. Car window tinting is carried out in four stages:
- cleaning and washing of surfaces to be pasted;
- cutting blanks from film;
- tinting flat car windows;
- processing of curved glass.
Although doing such work with your own hands, in general, is not difficult, it requires painstakingness and does not tolerate fuss and haste.
Therefore, in order to carry out high-quality tinting of car windows, you should allocate a sufficient amount of free time, and most importantly, prepare the necessary tools and materials.

Preparing for tinting
Almost everything that is necessary to carry out the work is available on the farm of the vast majority of people:
- water sprayer;
- sharp blade or stationery knife;
- soft, clean, lint-free rags;
- detergent;
- rubber spatula.
You will also need warm water. You can tint a car yourself without a hairdryer, but it greatly speeds up the process, so if you have one, you should use that too. Helps well in preparing for work didactic material, available in abundance on the Internet. Videos and photos demonstrating how step-by-step tinting of car windows is carried out will clearly show all the subtleties of the process that cannot be conveyed in words.
Glass preparation
A prerequisite for quality tinting is preliminary washing of the car and workplace. Small grains of sand are main reason possible defects. Car tinting is done exclusively on a clean surface and in fairly sterile conditions. It is clear that it will not be possible to create operating room conditions in a garage, but there should also be no clouds of dust while working with film. Car windows are washed on both sides using a soap solution and then wiped thoroughly.

Care must be taken to ensure that no lint remains on the surface. The most convenient way to do this is with a blade or a stationery knife, which will help clean car windows.
After this, a foam solution is prepared. For this purpose, you can use any shampoo or detergent available. The solution is poured into the sprayer and at this point the preparatory stage is completed and the main action begins.
Preparing film for gluing
Blanks for car glass are cut in different ways. You can make stencil patterns from scrap materials and work with them. Using this method, you can achieve a perfect match of sizes, but it will take quite a long time. The easiest way is to apply the film with the reverse side to the outside of the car and cut it in place. First, the bottom and sides are adjusted with maximum precision, and then the top, where an allowance of several centimeters remains.
You should start working with the side windows of the car, which have a flat surface. After practicing on them and achieving a positive result, you can begin a more complex task - cutting out blanks for the front and rear window, if you also decide to tint them yourself. If possible, it is better to watch how this is done on video or step by step photos, because it is very important to ensure that the film adheres tightly to the car glass and that there are no gaps at the edges.
Tinting of flat and curved windows
The third and fourth stages of work follow the same principle, but the last one is much more difficult, especially for those who have not previously dealt with such things. The following main points can be highlighted in the process:
- separation of the protective film layer;
- spraying glass with soapy water;
- gradual application of tint to the surface to be pasted;
- removing air bubbles and leveling.
It is very convenient to separate the protective layer using tape, which is glued on both sides of the film. The soap solution provides good slip, so the tint can be easily adjusted to the location. A spatula is needed to disperse air bubbles around the edges and remove them from under the film. If it is made of rubber, then you don’t have to worry about tearing the thin material of the adhesive coating.
Without a hairdryer, it is quite difficult to fit a flat film under curved glass; it allows, by heating the material, to slightly deform it, ensuring a tight fit over the entire surface.

Finishing touches
Do-it-yourself tinting is completed by drying the pasted film. It is convenient to use a hair dryer for this purpose, but you do not need to be too zealous in heating so that the coating material does not become deformed from heating. It is best not to touch the results of the work for three days, then everything is guaranteed to dry out, and the film will stick to the glass efficiently and for a long time.
Do-it-yourself tinting will allow you to save money, but most likely, the first time it will look worse than professional work in a car repair shop. But even the most outstanding masters once began their work, taking their first steps and making mistakes. If you look at videos and photos showing cars tinted by self-taught craftsmen, it is impossible to distinguish the results of their work from branded products.
Victory can only be achieved by those who constantly move forward, which means that if today’s work was not very good, then next time it will turn out much better. The main thing is not to give up, learn from professionals and improve your own skills.
Today on domestic roads it is increasingly rare to find a vehicle whose windows are not tinted. This article will tell you about the undeniable advantages of protective film and how to tint car windows with your own hands.
Pros of high-quality tinting:

- Tinted glass, unlike transparent glass, has good reflective ability, which allows you to significantly muffle the glare of the sun. Thanks to this, the driver vehicle feels comfortable while driving a car in bright sunlight. At night, tinting minimizes the likelihood of the driver being blinded by the headlights of other cars.
- The interior of a tinted car does not fade, because... reliably protected from the negative effects of direct ultraviolet rays.
- Dark windows do not allow intruders to view the interior, thereby protecting documents and personal belongings that may be on the seats.
- After the tinting procedure, the glass acquires additional strength, making it more resistant to various mechanical damage (scratches, chips, etc.).
- The aesthetic component is also of great importance. Tinted windows invariably give the car a solid look, emphasizing its individuality and solidity.

Choosing a tint film

You need to choose the tinting material with special care, because... On the market you can find many cheap and impractical fakes, which are not recommended to be purchased. It is best to give preference to popular and time-tested manufacturers, because... Only they have modern equipment that allows them to obtain a high-quality product that meets the highest requirements and strict standards.
Next, you need to decide on the color of the tint and the intensity of the darkening. It must be remembered that the percentage of light transmittance of the windshield and front side windows is strictly regulated by current legislation, which must be strictly adhered to. The use of mirror dimming is strictly prohibited.
Tools needed for tinting:
- polyester (tinting) film;
- rubber spatula or plastic sticker;
- a small amount of ordinary shampoo;
- spray gun (manual);
- sharp knife (it is best to use a stationery knife);
- glass cleaning composition;
- clean, dry wipes or lint-free rags;
- water.
Tinting stages

The procedure for darkening windows is quite simple, however, in the absence of experience, it can take more time from a car enthusiast than from employees of specialized car services.
Work is best carried out in a brightly lit, dry and dust-free room. If there is none, the process can be carried out outside, during calm, cloudy weather.
Before carrying out work, the car must be washed thoroughly. Glass surfaces to be darkened are thoroughly cleaned of any dirt and grease. In order for the tint film to lay perfectly flat, the glass should not have chips or scratches.
Next, the films are cut into blanks. To do this, you need to wet the glass, then apply a protective film to it and cut it to the shape of the glass. In this case, it is advisable to take into account a margin of 7–10 mm at the edges of the material, which is then trimmed with a stationery knife.
When the blanks are made, they are removed from the glass, which must be thoroughly washed before tinting.
At the next stage, you need to dissolve a small amount of shampoo in water (to obtain a 15 - 20 percent solution), and then pour the mixture into a hand spray bottle.
The entire area of glass on which the film will be applied must be well sprayed with a shampoo solution. This is done to temporarily neutralize the glue on the tint material. Thanks to this procedure, you will have 20 - 30 minutes left, during which the film can be moved over the surface of the glass without fear that it will stick to it.
After the film is installed on the glass, you need to remove all air bubbles and shampoo residues from under it (it is best to start from the center of the darkened surface). This procedure is carried out using a special sticker or spatula. All squeezed out soapy water is removed using clean napkins and rags.

Excess material is carefully cut off with a stationery knife in such a way as to leave a remainder of 1 to 2 mm at the edges. This excess in the lower part of the glass must be placed under the insulation, thereby preventing the possibility of cracking and peeling of the material in the future.
Photo


Video
Tinting technology is also discussed in the following videos:
Do-it-yourself tinting, if the application technique is properly followed, can make your car very beautiful. Many car enthusiasts use their creativity when applying tint at home with good results.
A responsible approach to business will not only create comfort in the salon, but also give appearance car respectability. The main subtleties and tuning technology will be presented to your attention. The installation of tinting will affect not only the rear and side windows, but also the headlights of the car.
General requirements for film selection
Before you tint your car with your own hands in order to save money and get some drive, let’s remember general recommendations Russian legislation. Firstly, factory tinting of car windows does not make them completely transparent. Therefore, when choosing a film coating, add the factory “patina” to the original light transmission.
Secondly, do not forget that only the rear hemisphere of the car is not adjustable in terms of light transmission. While the windshield must transmit at least 75% of the light flux. Side front windows – at least 70%.
The next point concerns the choice of film. Consultation with the seller will help you make your choice. Our advice would be as follows:
- Don't trust cheap suppliers (eg China).
- Choose prestigious manufacturers such as: Sun Commonwealth Laminating, llumar Courtaulds performes Films, 3M, Sun Tek, Llumar, etc.
It is worth mentioning two methods of tinting car windows yourself: removable and static. Static coating is suitable for more conservative car owners who do not like change. In this case, it is necessary to make sure that the light transmittance of auto glass complies with GOST.
Removable window tinting is carried out on their own by representatives who are not law-abiding. Such drivers count on strong darkening of the interior and quick removal of the darkening frame at the sight of traffic police officers.
In addition to improved decorative properties, a tinted car has other characteristics on its own:
- Additional protection against stones and other sharp and heavy objects.
- Restoring glass surfaces that already have small chips or scratches with a protective layer.
Advice! Special attention It is worth paying attention to tinting the headlights with film. Excessive darkening or change in color of light emission can result in problems with traffic police officers.
For high-quality gluing on their own, inexperienced car enthusiasts can choose the following priority types of coatings:
- Painted.
- Metallized.
The second option is more highly durable, but more expensive.
Types of tints
In addition to removable and static (permanent) types of interior darkening, there are other methods of car tinting. One of them is automatic tinting. It is quite possible to install it with your own hands. However, not every handicraft “specialist” succeeds in it, since it is a complex mechanism. Automatic dimming involves two moving windows, one of which is tinted.
Designed by this mechanism V garage conditions through the efforts of the car owners themselves. Some auto repair shops perform this type of installation on predominantly domestic vehicles. Self-installation The mechanism costs from 5,000 to 10,000 rubles. Specialists charge between 30–50 thousand rubles for their services.
Additional benefits of installing double windows:
- reliably protects against penetration of sunlight;
- there is no overheating of the car showroom;
- less energy consumption for air conditioning operation;
- excellent external characteristics;
- improved sound insulation.
Another known alternative is electronic tinting. It is unlikely that you will be able to make it yourself, since this type is a layering of liquid crystals. Under the influence of electrical voltage, the layers of crystals change light transmission. To perform electrical tinting with your own hands, you need to have special equipment and a good knowledge of physics. This darkening is almost never used in Russia, since the cost of electric tinting sometimes exceeds the price of the vehicle itself.
Do-it-yourself hard removable tinting can be made by some craftsmen. It can be mounted on either an additional plastic or glass frame. Can be attached to vacuum suction cups or other devices. The latest innovations are offered to drivers in the form of attachments for dry auto glass. The window moves along with the coating. Visibility in the cabin is not affected at all. The cost of such a “nozzle” varies from 2000 to 4000 rubles.
How to properly tint a car?
Having chosen layering for your car and directly on certain glass surfaces, we prepare the tools. It is worth taking care of the room in which the first experiment will take place. Interference in the form of dust, insects, wind, bright sun and other negative factors is best avoided. Therefore, the street option will not suit you. Here are the tools you'll need:
- Tinting film with a large margin. Keep in mind that “the first pancake is always lumpy.” Most likely, you will have to cut out an additional copy. Add 20% for customization.
- Water spray spray.
- Any liquid detergent. Commercial glass cleaner will not work.
- Stationery knife or blade.
- Lint-free wipes or toilet paper.
- A spatula for smoothing the surface, called forcing. Usually made of plastic and has no sharp edges.
- Special nozzle for cleaning windows.
- Industrial hair dryer capable of reaching temperatures up to 550°C.
We talked about indoor spaces, and now let’s prepare the surface for the sticker. We follow the further instructions, starting the first stage of preparation from the side window.
Preparatory stage
At this stage, we prepare all the materials and available tools:
- Prepare a soap solution consisting of filtered clean water and a few drops of any detergent.
- Dust is the main source of bubbles that are difficult to get rid of. Therefore, it is important to follow the next step - to clean the interior of the car from dust.
- It is convenient to make a pattern of tinted film on a wide and stable table.
- We place the surface of the film on the glass and cut out the “template” along the edges.
- An important point regarding the type of layering is to read the instructions for use.

Separation of the film web:
- To prevent the thin material from deforming, after separation we hold it with tape on the frame. Place small pieces of tape on opposite sides of the cut piece.
- After completely separating the layers, remove the tape.
The main stage of applying tinting
The most difficult and critical stage of applying tinting. How the work is performed at the main stage determines what the result will be and what your car will look like:
- Pour the prepared cleaning solution into a spray bottle. We use window cleaning liquid. After spraying the liquid, remove the soap solution using a rubber nozzle from left to right and then down.
- Omit side glass 2–3 cm, cleaning the edge.
- We repeat the procedure again for the best adhesion of the material.
- Wet the glass generously with the solution from a spray bottle.
- Separate the film and the protective layer. Gradually, as the protective layer separates, we wet the base layer from a spray bottle.
- An important point is that as the layers are separated and irrigated, we begin to apply the tinting layer on the inside of the car glass itself. We begin to apply by retreating 2 mm from the edge. The high-quality completion of gluing depends on maximum accuracy and precision of movements at the beginning of work.
- After partially applying the tinting material, spray water again. An abundant amount of liquid guarantees unhindered sliding of the spatula (forcing) along the direction lines. In this way, high-quality attachment of the film to the glass surface is achieved.
- Noticing that 2/3 of the surfaces have adhered, lift the window all the way. While lifting, make sure that the edges of the pattern fit into the grooves without deformation.
- We finally glue the remaining film coating on the bottom side of the window, continuing irrigation.
- Again we wet the outer side of the coating with water and continue adhesion of the layer by forcing. In other words, as if expelling liquid from under the outer surface.
- Final fixation is carried out using a hair dryer. It is recommended to hold the hair dryer in one place for about 5–10 seconds, no more. Otherwise, the film will shrink and you will need to re-moisten it.
Do not move the glass for 2-3 days. We are waiting for complete fixation.
DIY windshield tinting
The rear car window is tinted in the same way as the side windows, which were mentioned at the beginning. However, it is worth learning about some of the nuances that beginners encounter:
- Before starting work, examine all irregularities. They can occur due to the presence of heat lines. When lines are detected, the film trim size should be 1/3. That is, the shading part is cut into 3 parts and glued overlapping where the unevenness occurs.
- Gluing begins from the top, smoothly moving down in three stages: top, middle, bottom.
- When wet, the pattern can be moved around for even distribution. If adjustments are necessary, it is recommended to additionally moisten with water.
- It is better to “iron” the film coating from the bottom up. Then from the central part we distribute the film sheet to the sides.
- Using a hairdryer and forcing we achieve 100% attachment.
How to tint headlights with your own hands?
After pasting the car windows yourself, tinting the rear headlights on your own will not seem difficult to you.
On a note! Spray tinting is not considered the best way, as it is difficult to remove. Scratches, roughness and abrasions remain on the lanterns. A similar result awaits the car owner if you do the tinting of the headlights with varnish yourself.
Tuning a car with regard to lights is actually difficult. The fact is that it becomes necessary to remove the lights from under the housing. The process is quite painstaking, but the technology for applying the tint is similar to tinting the side windows of a car at home. The priority of film layering instead of varnish spraying is as follows:
- You can change the tone if you're tired of last year's.
- The surface of the headlights remains smooth.
Removing tint
We talked a lot about how to make a removable tint with your own hands and install a permanent one. However, after a while, many car enthusiasts will begin to worry about the question of how to remove the tint with their own hands. We will briefly describe several options for removing tinting from headlights and other auto glass:
- Using a steam generator or a hair dryer.
- Using a blade without additional wetting.
- Using a soap solution to tint glass and blades.
Tinting your car yourself is a completely doable task, allowing you to save a lot of money. In addition, by completing it, you will gain additional knowledge and skills. No one will do a better job than you, because you are doing it for yourself. However, you should not be fooled and think that tinting yourself is a completely simple matter; this work requires attentiveness, accuracy and patience.
Benefits of tinting
A tinted car has many advantages:
- Side window tinting protects plastic parts car from overheating and subsequent cracking;
- Reduces interior heating due to exposure to sunlight by approximately 50%;
- Increases vehicle safety. So, when glass breaks, the fragments remain on the tinting film, which reduces the likelihood of damage to the driver and passengers;
- Tinting hides the contents of the interior from prying eyes, which reduces the risk of car theft;
- Finally, a tinted car looks much more visually attractive than an untinted one.
But it is worth remembering that there is a limit on the amount of reflected light and, by law, it should not exceed 25%.
How to choose a tint film?
Currently, the market for tinting films is so saturated that it is difficult for an inexperienced person to make a choice. When buying tinting film for side windows, it is better not to save on its cost, but to choose a high-quality one from a reputable manufacturer. It would be a good idea to consult with friends who have been using such film for several years and can tell you how it behaves in practice. The choice of tint film is very important stage preparation for car tinting. After all, tinting is not done for one year. The simplest and most inexpensive tint film is a single-layer one with a colored adhesive layer. The strongest and most durable - multi-layer with metal coating, neutral color.
The most popular certified and guaranteed tint films are listed below:

- SunTek
- Llumar
- Sun Control
- Safe-Gard, Glass-Gard, Sun-Gard,
- Johnson Window Films
- MSC/Solar Gard
- "3M".
The film usually comes with a knife and a spatula for smoothing. The size of the film in one package is 1.5 - 2 square meters. This amount is enough to tint all the side windows of the car.

If you want to stand out, you can do art tinting. Such tinting will help make your car much more noticeable among others, but it can only be done with extensive tinting experience. Therefore, it is better to entrust it to a professional.
You can also use armor tinting for side windows, which protects the glass from scratches and chips.
Tools for work

Before you start, you need to collect everything necessary tools, namely:
- container with sprayer;
- warm water;
- detergents;
- tint film;
- stationery knife;
- rubber spatula;
- lint-free napkin.
All these materials should be on hand before starting work.
Side window tinting technique
When tinting a car, you should always start with the side windows to get the hang of it. And when you already have tinting experience, you can move on to more complex tinting of the front and rear windows.
Attention! Tinting of side windows should only be done on undamaged glass; if there is minor damage, it is worth making repairs.
Preparation
Advice: it is better to carry out tinting on a cloudy day. After rain there will be less dust, which causes “bubbles” to appear.
Wash both sides of the glass well. To clean the glass from sand, use a scraper (spatula). When tinting the glass without removing it, before washing it is necessary to remove the seals and cover the upholstery to avoid contact with soapy water and soap.

Cut the tint along the contour of the glass. To do this, wet the glass on the outside of the car with soapy water, then apply the tint and cut along the contour of the glass with a utility knife.

At this stage you will need an assistant. It should hold the tint itself, and you peel off the protective film while simultaneously spraying the adhesive side with soapy water.

Moisten the inner surface of the glass with soapy water and apply the tint to it with an adhesive layer. The soap solution neutralizes the glue for a few seconds and you can carefully align the film.

Using a spatula, remove the solution from under the tint. Movements should be from the center to the edges of the glass. Wipe the removed solution with a lint-free cloth.